DuckDB -- MVCC和增删改查
DuckDB的MVCC实现来自于论文,但是DuckDB做了一定的简化。即它的隔离级别并不是可串行化,而是保证Snapshot的隔离,从而它的实现复杂度大幅降低。这篇文章会详细描述DuckDB的MVCC机制,以及增删改查是如何实现的。
注意:
- DuckDB是我看的第一个数据库的实现。因此这篇文章并不会比较它与其他数据库在MVCC上的优劣。
- 这篇文章并不会事无巨细的把所有实现细节解析出来,只是为了让你可以完整了解是怎么实现的,后续实际看源码时可以更方便的理解。
前置知识
-
DuckDB的状态跟踪
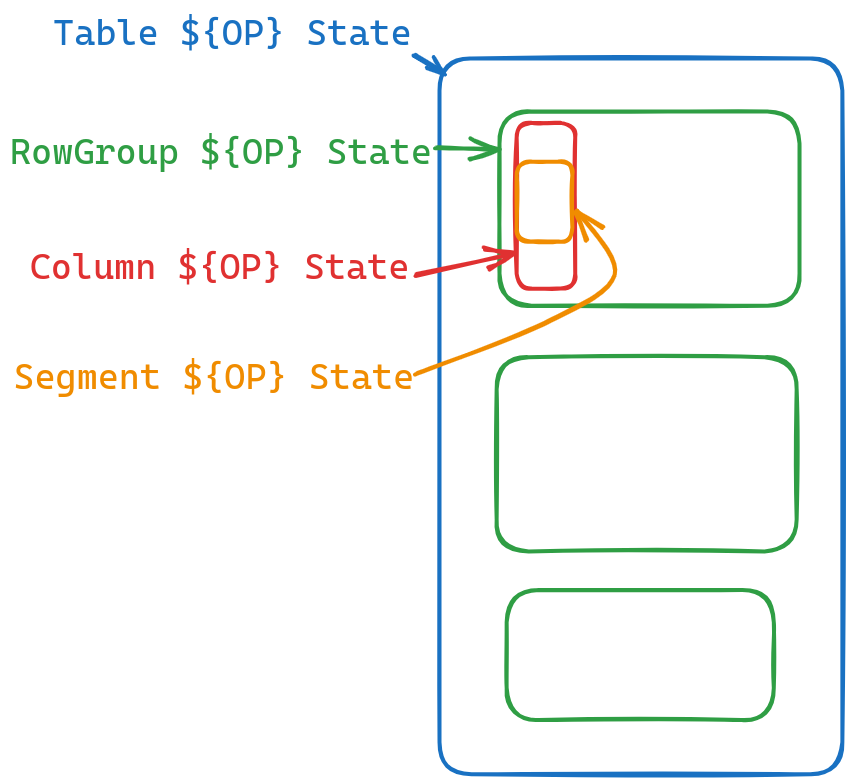
DuckDB无论增删改查都会有一个状态一直跟踪整个过程,比如查询表的话,它会有一个
TableScanGlobalSourceState和一个TableScanLocalSourceState对整个查询流程进行跟踪,这个state主要追踪的是当前进行到哪一行了,还剩多少行,等等。对于每个算子,这个global和local代表的具体含义都会一些不同,后面具体讲增删改查的时候会进行描述。因为DuckDB的table格式可以划分为rowGroups -> rowGroup -> column -> segment。所以实际上每一个单元都有一个相应的state进行追踪。
-
DuckDB的local storage
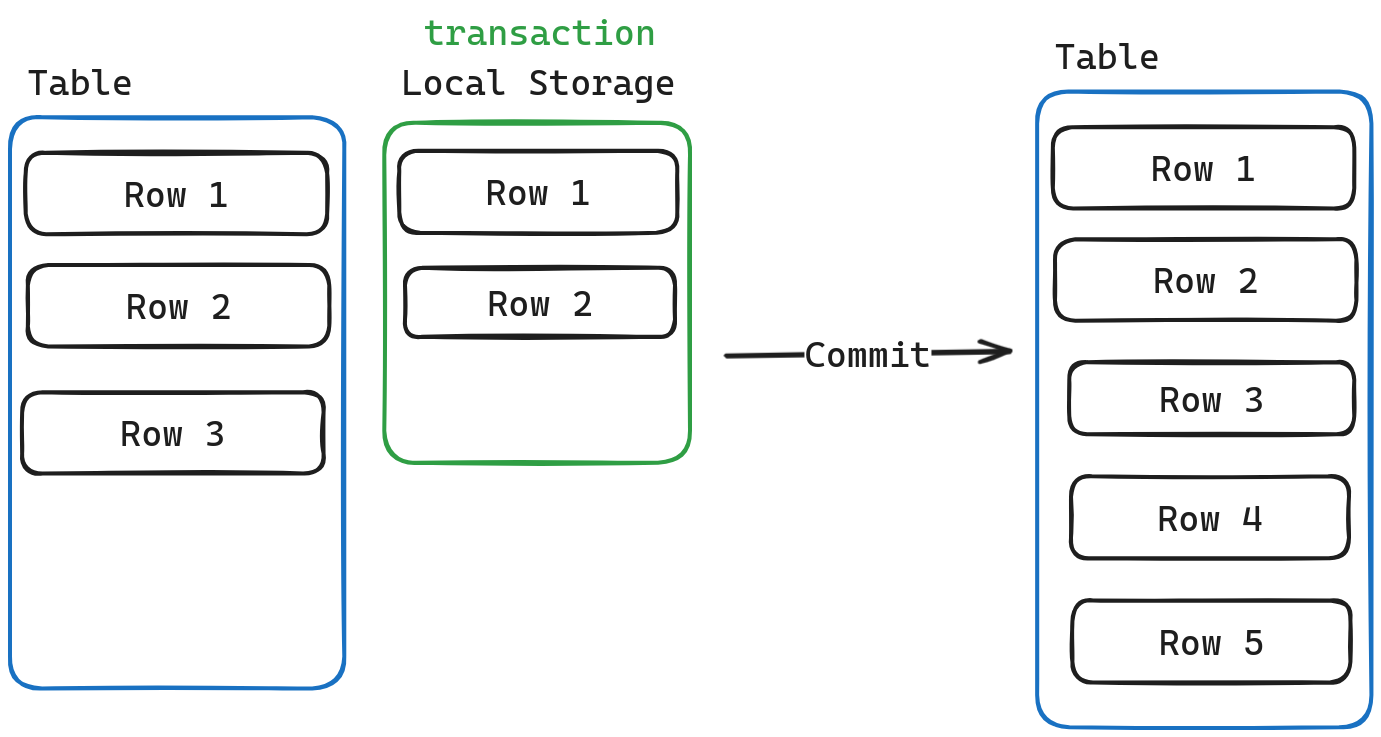
DuckDB的存储可以分为两块。一块是
table,代表这个表在磁盘中的状态,另一块是local storage, 代表这个事务中对该表做的操作,比如增删改查等等… 而local storage只有在commit的时候才会去和table进行合并。这有两点好处。- 增加事务的并发度。
- rollback时几乎无成本。
-
DuckDB的MVCC粒度
DuckDB的的MVCC粒度是对
Segment而言的,即每一个column中的部分数据,会有一个version info记录着它是被哪个事务加入的,又是被哪个事务删除的。同时还会有一个Update Segment记录着它的Update Version.

MVCC
DuckDB会为每一个新创建的transaction赋两个值。
- transaction id(从2^62开始递增)
- start time (从2开始递增)
这样赋值的原因在于,在一个transaction还未提交时,我们会使用transaction id作为它的commit id,只有当它提交以后,我们才会将commit id设置为提交的这一时间。这样就可以确保当事务仍未提交时,它所作出的更改不会被看到。
我先用文字描述MVCC的实现。然后通过一个例子更直观的理解该实现。
文字描述
我们会对每一个Segment维护一个链表,链表中存储版本信息。版本信息中的version初始化为transaction id,当commit时,再更新为commit id (版本信息中保存的是,这个事务变更前的数据)。
当我们对数据进行扫描时,我们会不断比较version与当前事务的start time。当满足以下两个条件,我们就会应用其保存的版本。
-
version_number > start_time
说明这个版本还未commit,或者这个版本在事务开始之后才commit.那么我们应当还原成这个事务之前的版本,即应用该版本。
-
version_number != transaction_id
我们不会将数据还原为这次事务之前的版本。
当我们对数据进行更改时,我们会直接在原地进行修改,然后将更改之前的数据保存进Undo Buffer,插入链表的头部。
DuckDB为了可以对列进行压缩,并没有直接进行原地更改,相反它是在链表头部保存了一个哑节点。它的原地修改就是直接修改哑节点,这个并不妨碍理解MVCC,所以可以直接认为Duck也在原地修改。
例子
下面我们考虑以下例子。
我们有一张银行存款表,里面每一个储户的余额都为10,同时我们有4个事务同时执行。
- Txn1 Thomas 向 Larry 转1元
- Txn2 Thomas 向 Tom 转1元
- Txn3 求和
- Txn4 Thomas 向 Andy 转1元
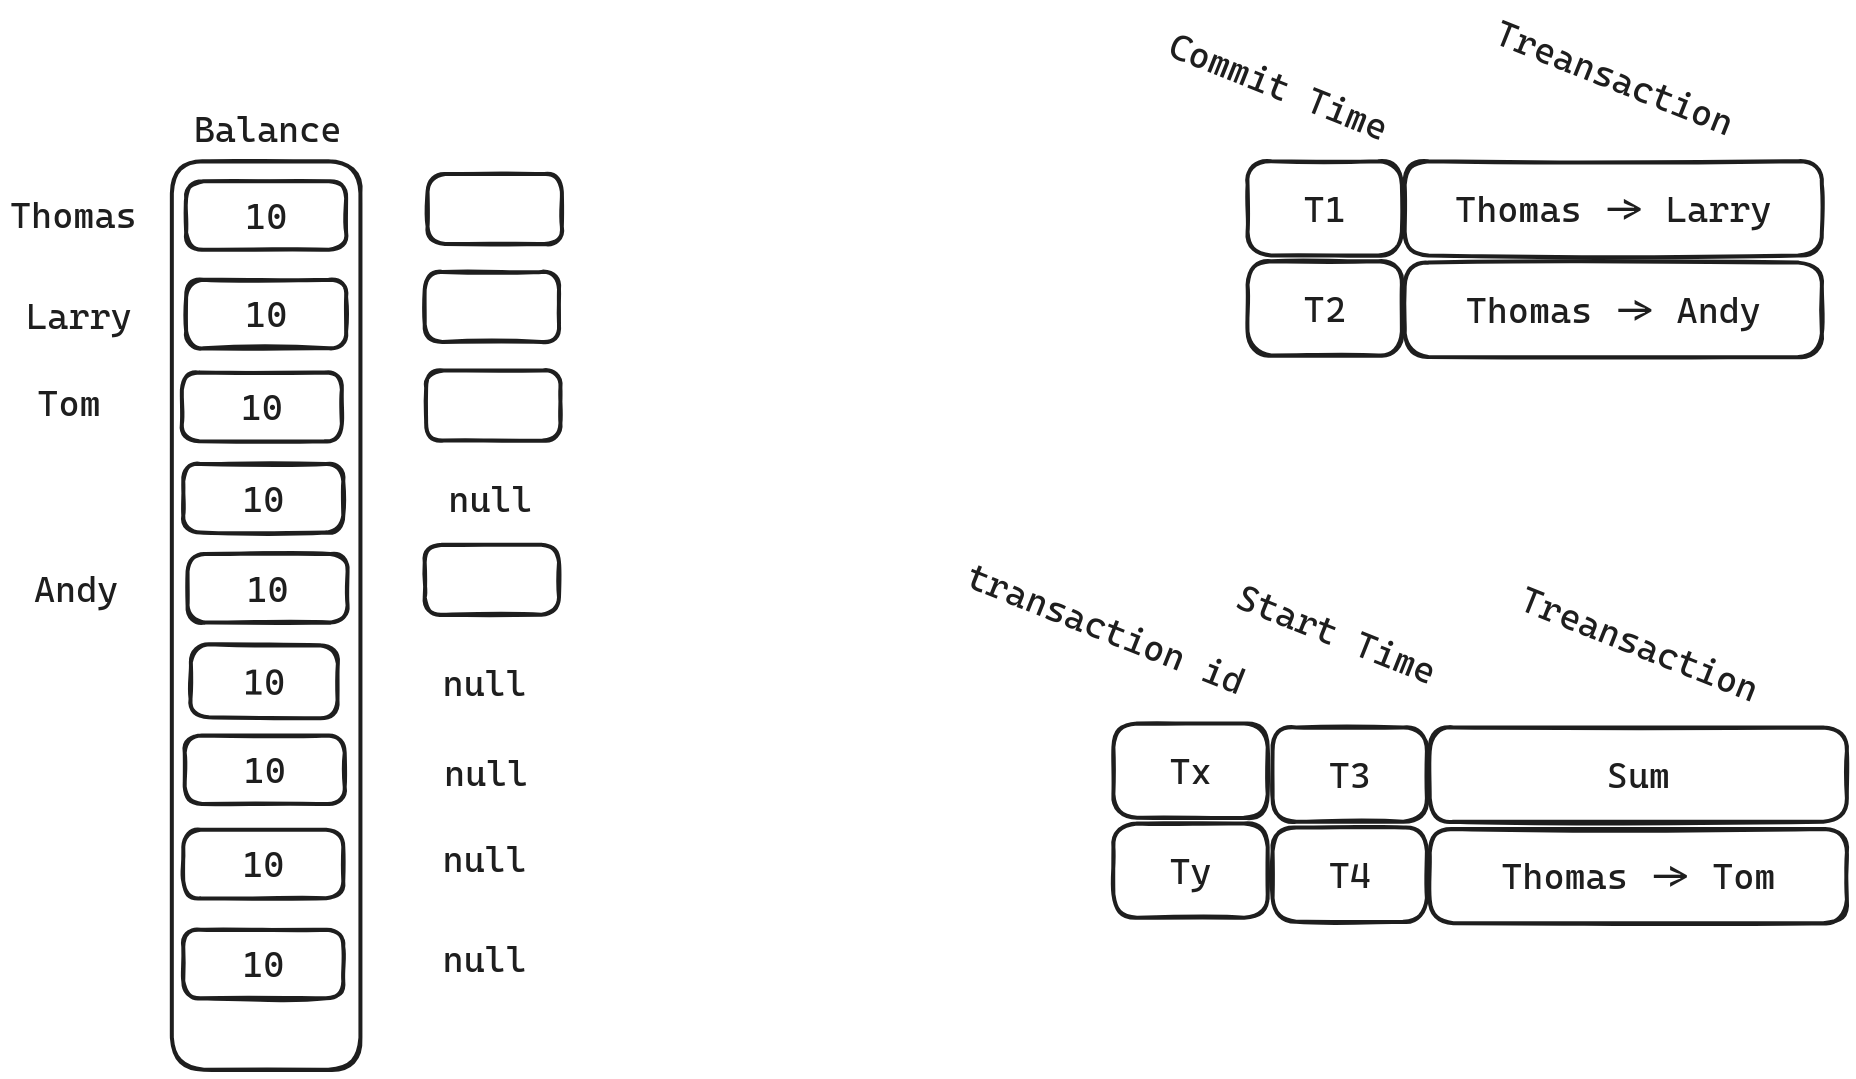
我们假设Txn1, Txn4已经commit, 而 Txn2, Txn3仍在执行,并且Txn1, Txn4在T1, T2commit,而Txn2, Txn3在T3,T4开启了事务。他们的transaction id为一个十分大的数。那么此时整体的version info 如下图所示。
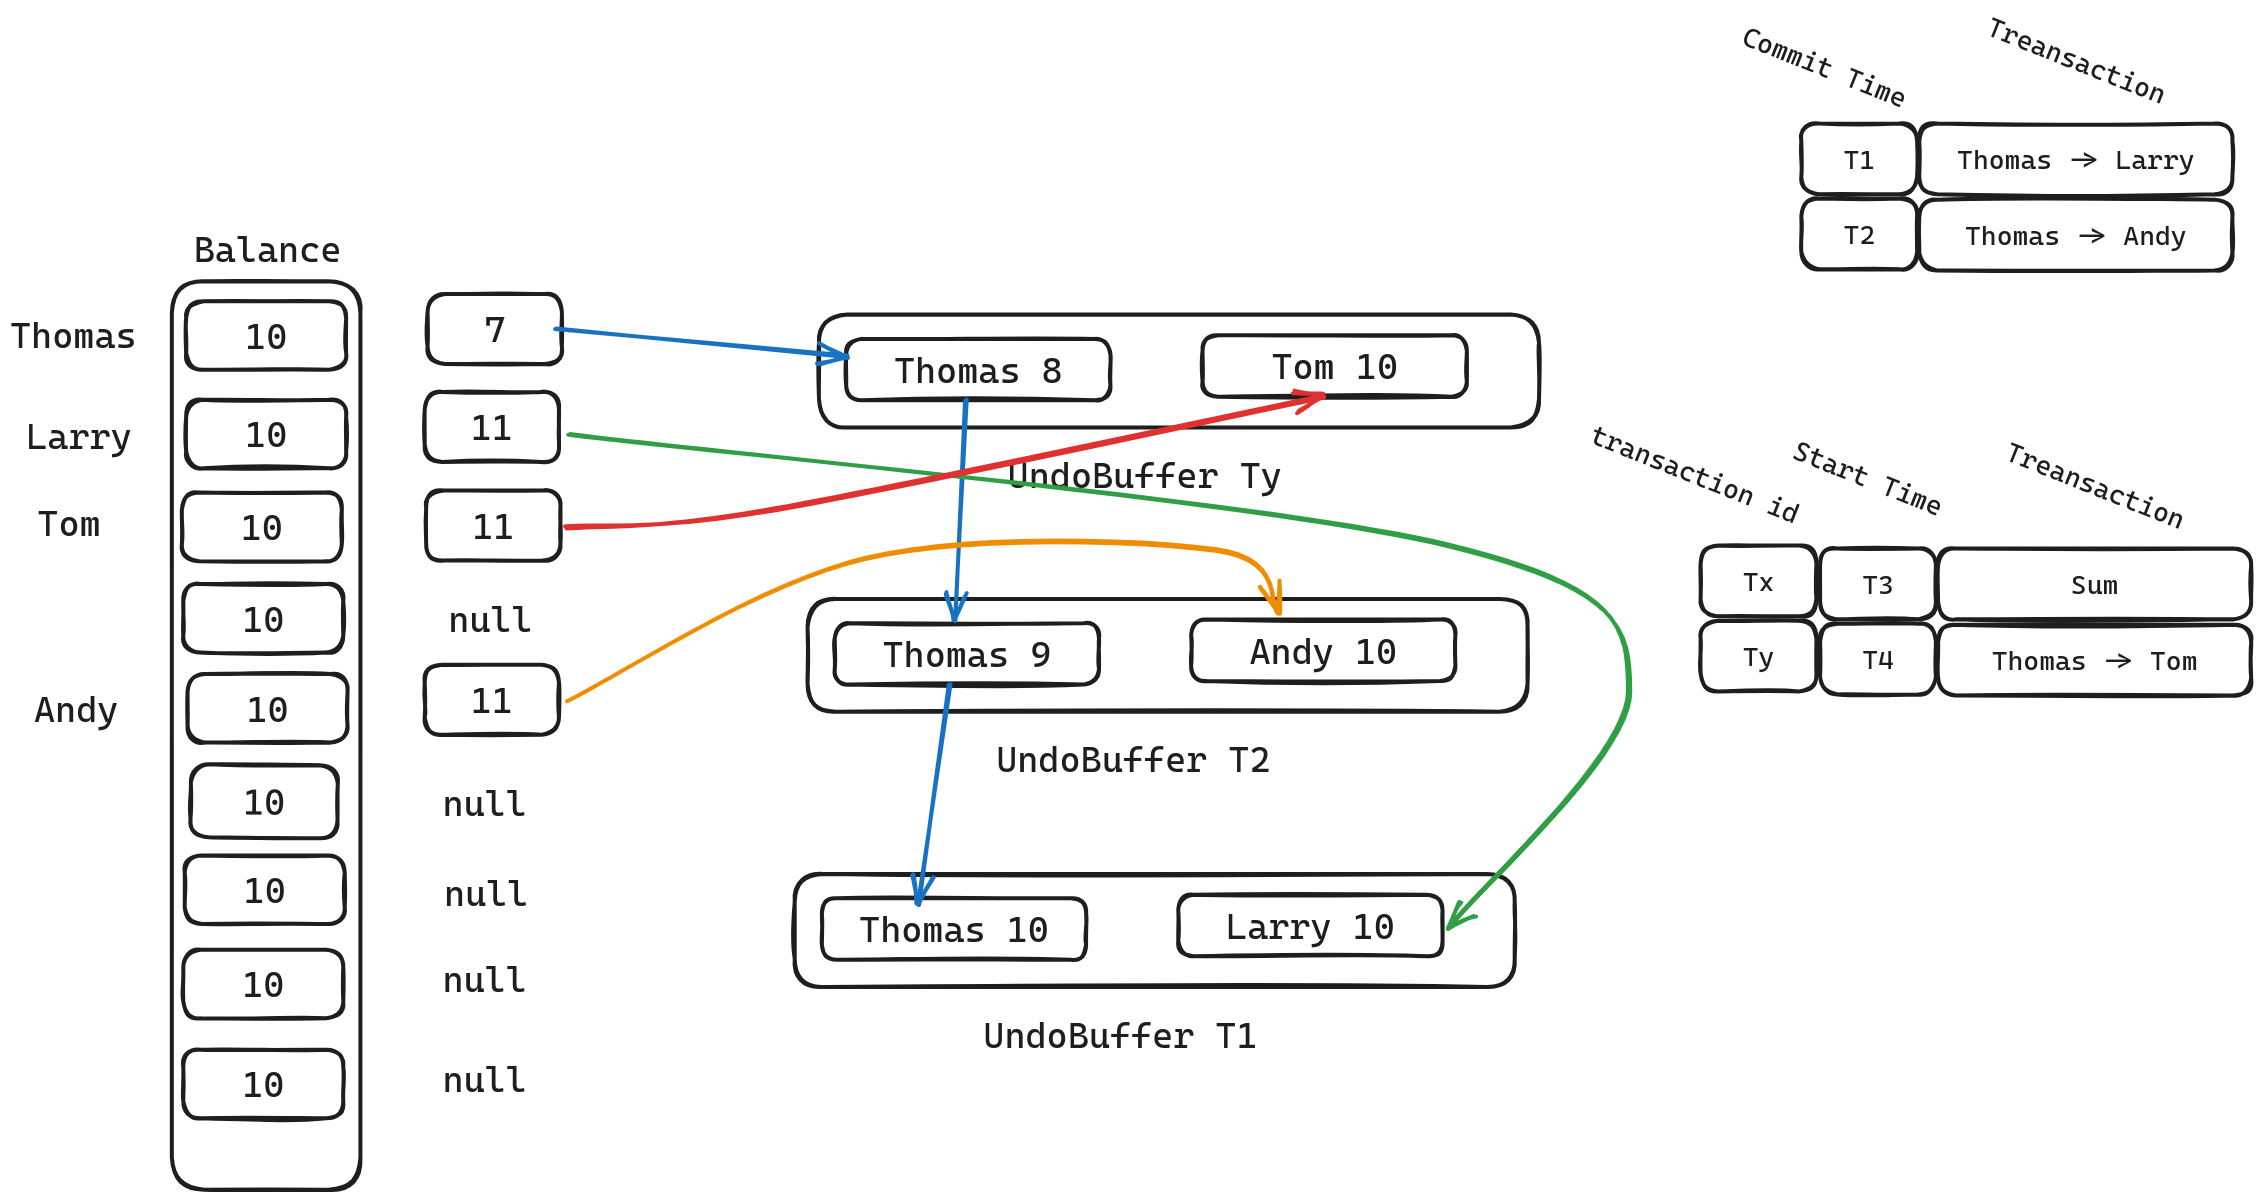
我们可以看到每一个事务都有一个对应的Undo Buffer,同时每一版本的信息都有一个链表来进行维护。我们下面来考虑事务Txn3的执行情况。
当读取Thomas的Balance时,table中的数据为10,但是因为Thomas的版本信息不为null,所以我们需要遍历链表查看是否有更合适的版本。
- 哑节点直接应用, banlance 变为7
UndoBuffer Ty, 因为Ty > T3, balance变为8。UndoBuffer T2, 因为T2 < T3, 不应用。UndoBuffer T1, 因为T1 < T3, 不应用。
最终得到的结果为8.符合快照隔离的要求。
后续几个读取的流程留给读者自己练习, 我们下面介绍DuckDB的增删改查。
Insert
Insert 的入口函数为PhysicalInsert::Sink
if (!parallel) {
		// init global state if not initialized
		if (!gstate.initialized) {
			storage.InitializeLocalAppend(gstate.append_state, context.client);
			gstate.initialized = true;
		}

		// check if has some conflict with the rules such as UNIQUE, FOREIGN KEY, etc.
		idx_t updated_tuples = OnConflictHandling(table, context, lstate);
		gstate.insert_count += lstate.insert_chunk.size();
		gstate.insert_count += updated_tuples;
		storage.LocalAppend(gstate.append_state, table, context.client, lstate.insert_chunk, true);

		if (return_chunk) {
			gstate.return_collection.Append(lstate.insert_chunk);
		}
	} else {
		// add into local state's insert chunk
		D_ASSERT(!return_chunk);
		// parallel append
		if (!lstate.local_collection) {
			lock_guard<mutex> l(gstate.lock);
			auto &table_info = storage.info;
			auto &block_manager = TableIOManager::Get(storage).GetBlockManagerForRowData();
			lstate.local_collection =
			    make_uniq<RowGroupCollection>(table_info, block_manager, insert_types, MAX_ROW_ID);
			lstate.local_collection->InitializeEmpty();
			lstate.local_collection->InitializeAppend(lstate.local_append_state);
			lstate.writer = &gstate.table.GetStorage().CreateOptimisticWriter(context.client);
		}
		OnConflictHandling(table, context, lstate);

		auto new_row_group = lstate.local_collection->Append(lstate.insert_chunk, lstate.local_append_state);
		if (new_row_group) {
			lstate.writer->WriteNewRowGroup(*lstate.local_collection);
		}
	}
从代码中,我们可以看到DuckDB的Insert有两种模式
- 并行化,每一个算子有自己独立的存储空间,并行插入,Combine的时候合入全局的存储空间 (合入的成本相较于插入成本低很多,因为只需要把指针指向新的位置即可)。
- 非并行化,每一个算子直接往全局的存储空间进行插入。
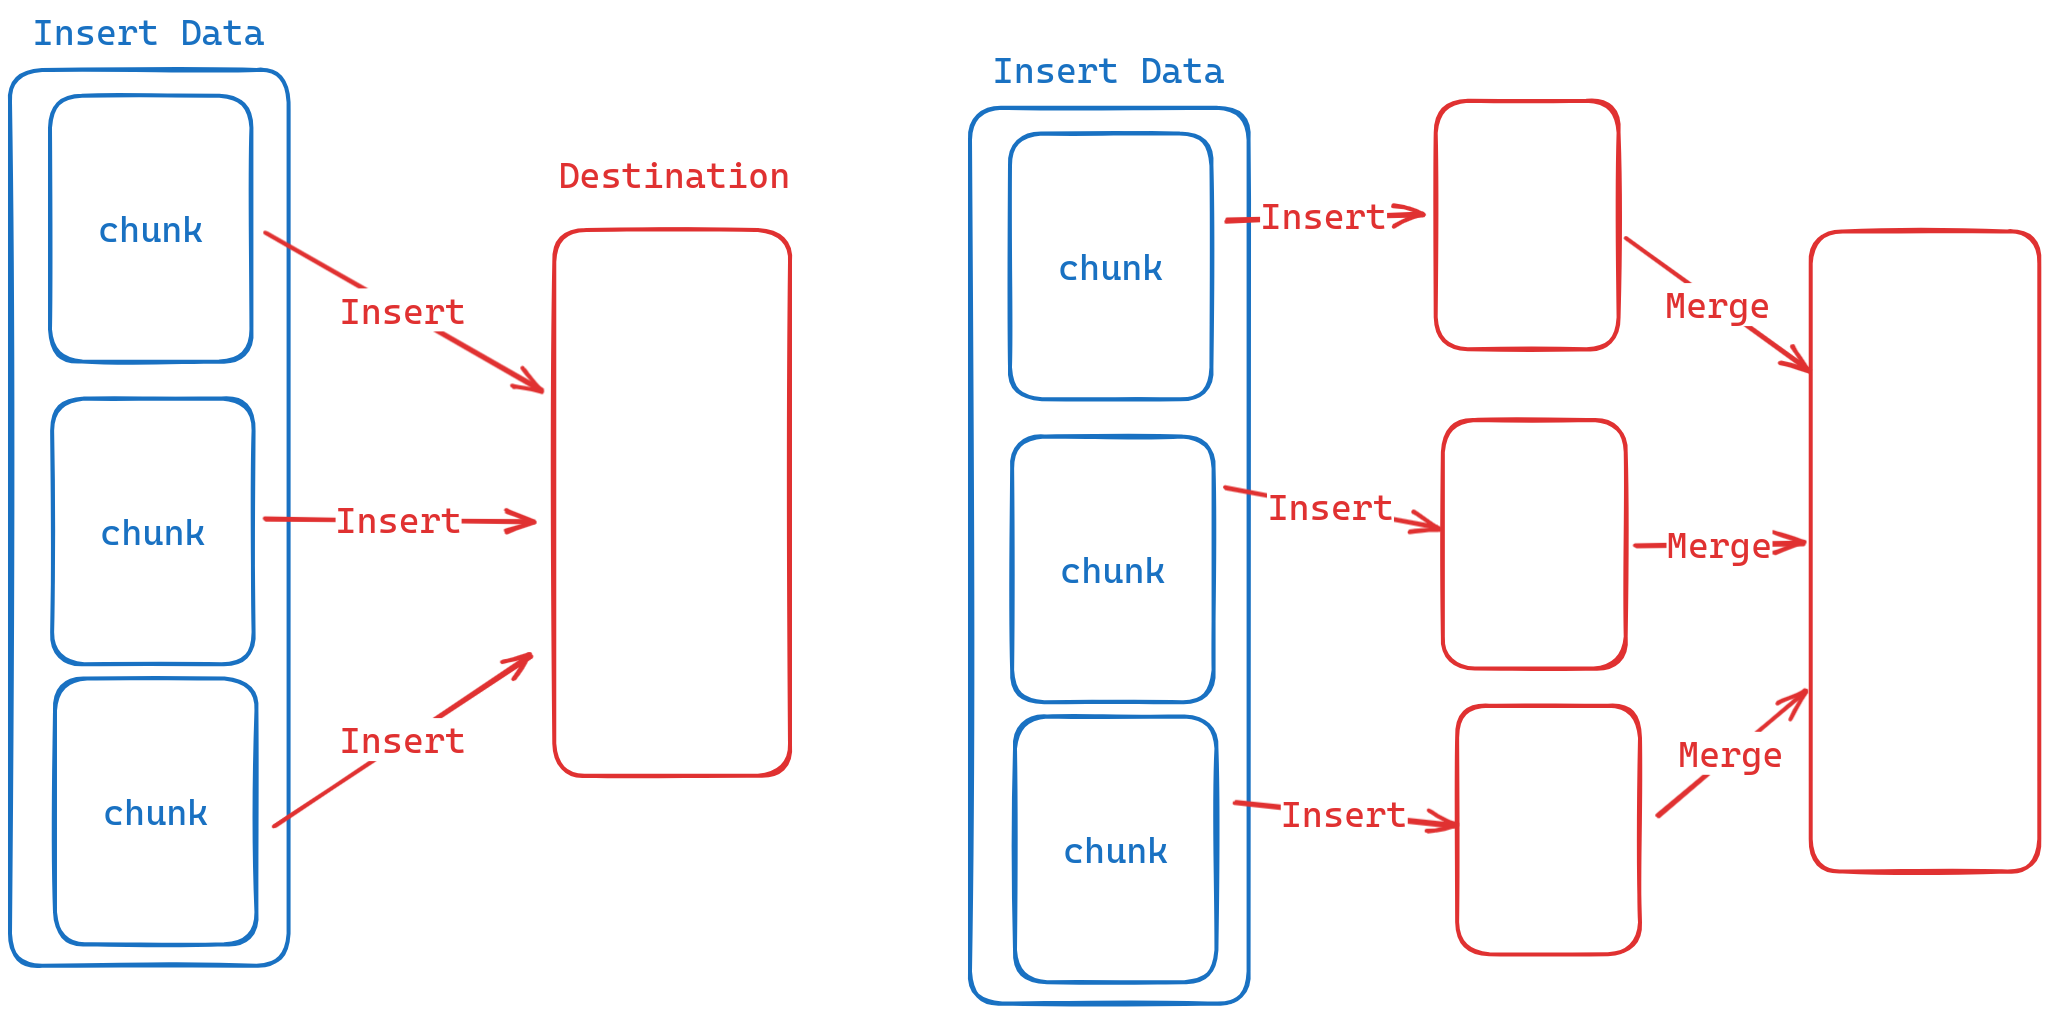
这里我只介绍非并行化,因为插入的流程是一样的,只是处理的方式不同,因此如果你理解了非并行化,那么你也理解了并行化的方式。
还记得前置知识中,我们说过,DuckDB中每一个table除了它在磁盘中的表示形式,他还有一个Local Storage专门用来存储未提交的事务对table进行的增量操作.而这个Local Storae的格式与table是完全一致的.即我们的添加流程为。
- 找到
table中要添加的RowGroup - 找到
RowGroup中要添加的Column - 找到
Column要添加的Segment - 根据
Segement使用的压缩方法不同,调用不同的压缩算法,把数据添加进Segment。 对应的代码片段参考如下
// add into rowGroups
bool RowGroupCollection::Append(DataChunk &chunk, TableAppendState &state) {

	idx_t append_count = chunk.size();
	idx_t remaining = chunk.size();
	auto current_row_group = state.row_group_append_state.row_group;
		// check how much we can fit into the current row_group
	idx_t append_count =
		    MinValue<idx_t>(remaining, RowGroup::ROW_GROUP_SIZE - state.row_group_append_state.offset_in_row_group);
		if (append_count > 0) {
			// !! insert into row group
			current_row_group->Append(state.row_group_append_state, chunk, append_count);
		// skip....
}

// add into rowGroup
void RowGroup::Append(RowGroupAppendState &state, DataChunk &chunk, idx_t append_count) {
	// append to the current row_group
	// append into all column
	for (idx_t i = 0; i < GetColumnCount(); i++) {
		auto &col_data = GetColumn(i);
		col_data.Append(state.states[i], chunk.data[i], append_count);
	}
	// update row group append state
	state.offset_in_row_group += append_count;
}

// add into column
void ColumnData::AppendData(BaseStatistics &stats, ColumnAppendState &state, UnifiedVectorFormat &vdata, idx_t count) {

	while (true) {
		// append the data from the vector
		idx_t copied_elements = state.current->Append(state, vdata, offset, count);

		// we couldn't fit everything we wanted in the current column segment, create a new one
		{
			auto l = data.Lock();
			AppendTransientSegment(l, state.current->start + state.current->count);
			state.current = data.GetLastSegment(l);
			state.current->InitializeAppend(state);
		}
		// skip...
	}
}

// use compress function to add data into column
idx_t ColumnSegment::Append(ColumnAppendState &state, UnifiedVectorFormat &append_data, idx_t offset, idx_t count) {
	D_ASSERT(segment_type == ColumnSegmentType::TRANSIENT);
	if (!function.get().append) {
		throw InternalException("Attempting to append to a segment without append method");
	}
	return function.get().append(*state.append_state, *this, stats, append_data, offset, count);
}
代码中有几点需要注意
-
如果
Segment空间不够,我们会创建新的Segment,但是这个Segement的类型为transientSegment。意味着这是一个临时Segment,当内存不足时,会把它写到临时文件中,然后释放这块内存。 -
当我们写满一块
RowGroup时,我们会将其刷入磁盘,仿佛这个RowGroup已经被添加到了table中。这是因为如果不这么做,当我们要插入的数据非常大时,我们需要频繁的把数据写到临时文件,这可能造成较大的性能问题。而提前刷入磁盘,我们只需要在rollback时,标记该区域为未使用区域,唯一的问题就是可能造成数据库磁盘文件膨胀。有兴趣的可以查看这个PR。
在我们将数据添加到Local Storage后,我们需要对该Insert进行Commit。
string DuckTransaction::Commit(AttachedDatabase &db, transaction_t commit_id, bool checkpoint) noexcept {
    // skip...
	try {

		storage->Commit(commit_state, *this);
		undo_buffer.Commit(iterator_state, log, commit_id);
		if (log) {
			// commit any sequences that were used to the WAL
			for (auto &entry : sequence_usage) {
				log->WriteSequenceValue(*entry.first, entry.second);
			}
		}
		if (storage_commit_state) {
            // WAL Flush to DISK
			storage_commit_state->FlushCommit();
		}
		return string();
	} catch (std::exception &ex) {
		return ex.what();
	}
}
代码中我们可以看到事务的提交就是三个流程
- storage commit
- UndoBuffer commit
- WAL 刷到磁盘中
Storage Commit
这个相对简单就是遍历LocalStorage中的chunk,然后将其添加到table中。
注意DuckDB每一个column都有insert_id, delete_id来描述,它是由哪个
transaction添加的,由哪个transaction删除的。代码中将其称为Version Info
在将数据添加到table后,我们将添加的信息加入到UndoBuffer中。格式为
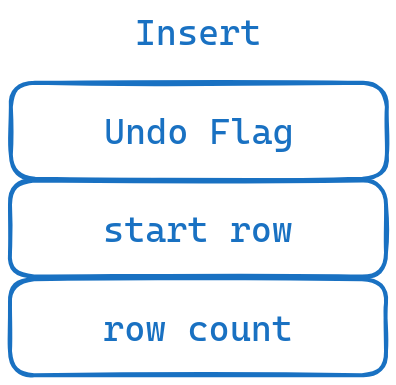
UndoBuffer Commit
逆序遍历UndoBuffer,根据不同的Undo Flag对每一个Entry进行不同的操作。
对于Insert而言
- 将新增的数据写到LOG中
- 将table中的对应的version info 由
transaction id更改为commit id
WAL 刷到磁盘中
在WAL中写WAL_FLUSH后,全部刷新到磁盘。后续Replay时,只有遇到WAL_FLUSH才会进行commit。因此如果在WAL刷到磁盘前断电,哪怕Storage/UndoBuffer Commit了,重启后也是不可见的。
Delete
Delete 的入口函数为PhysicalDelete::Sink
SinkResultType PhysicalDelete::Sink(ExecutionContext &context, DataChunk &chunk, OperatorSinkInput &input) const {
	auto &gstate = input.global_state.Cast<DeleteGlobalState>();
	auto &ustate = input.local_state.Cast<DeleteLocalState>();

	// get rows and
	auto &transaction = DuckTransaction::Get(context.client, table.db);
	auto &row_identifiers = chunk.data[row_id_index];

	// skip...
	gstate.deleted_count += table.Delete(tableref, context.client, row_identifiers, chunk.size());

	return SinkResultType::NEED_MORE_INPUT;
}

idx_t DataTable::Delete(TableCatalogEntry &table, ClientContext &context, Vector &row_identifiers, idx_t count) {
	while (pos < count) {
		idx_t start = pos;
		// transaction inserted tuples have row identifiers >= MAX_ROW_ID
		bool is_transaction_delete = ids[pos] >= MAX_ROW_ID;
		// figure out which batch of rows to delete now
		for (pos++; pos < count; pos++) {
			bool row_is_transaction_delete = ids[pos] >= MAX_ROW_ID;
			if (row_is_transaction_delete != is_transaction_delete) {
				break;
			}
		}
		idx_t current_offset = start;
		idx_t current_count = pos - start;

		Vector offset_ids(row_identifiers, current_offset, pos);
		if (is_transaction_delete) {
			// transaction-local delete
			// transaction add and transaction delete
			delete_count += local_storage.Delete(*this, offset_ids, current_count);
		} else {
			// regular table delete
			delete_count += row_groups->Delete(transaction, *this, ids + current_offset, current_count);
		}
	}
	return delete_count;
}从代码中可以看到,delete不同于insert,它是直接对table进行删除。但是delete会区分要删除的数据是transaction local的,还是table的。即是local storage还是table的,区分逻辑为transaction local的行号都是大于MAX_ROW_ID的。(删除逻辑是一样的,因此我们只需要看一个就行了)
首先我们需要找到要删除的Row Group
idx_t RowGroupCollection::Delete(TransactionData transaction, DataTable &table, row_t *ids, idx_t count) {
	idx_t delete_count = 0;
	// delete is in the row groups
	// we need to figure out for each id to which row group it belongs
	// usually all (or many) ids belong to the same row group
	// we iterate over the ids and check for every id if it belongs to the same row group as their predecessor
	idx_t pos = 0;
	do {
		idx_t start = pos;
		auto row_group = row_groups->GetSegment(ids[start]);
		for (pos++; pos < count; pos++) {
			D_ASSERT(ids[pos] >= 0);
			// check if this id still belongs to this row group
			if (idx_t(ids[pos]) < row_group->start) {
				// id is before row_group start -> it does not
				break;
			}
			if (idx_t(ids[pos]) >= row_group->start + row_group->count) {
				// id is after row group end -> it does not
				break;
			}
		}
		delete_count += row_group->Delete(transaction, table, ids + start, pos - start);
	} while (pos < count);
	return delete_count;
}但是我们并不需要实际删除该数据,我们所要做的仅仅是标记删除,即将对应数据的delete id标记为当前的transaction id, 表明被当前transaction删除。
void VersionDeleteState::Flush() {
	// no need to flush if there is nothing to flush
	if (count == 0) {
		return;
	}

	// it is possible for delete statements to delete the same tuple multiple times when combined with a USING clause
	// in the current_info->Delete, we check which tuples are actually deleted (excluding duplicate deletions)
	// this is returned in the actual_delete_count
	auto actual_delete_count = current_info->Delete(transaction.transaction_id, rows, count);
	delete_count += actual_delete_count;
	// we actually delete some tuples: push the delete into the undo buffer
	if (transaction.transaction && actual_delete_count > 0) {
		// now push the delete into the undo buffer, but only if any deletes were actually performed
		transaction.transaction->PushDelete(table, current_info, rows, actual_delete_count, base_row + chunk_row);
	}
	count = 0;
}

// delete according row
idx_t ChunkVectorInfo::Delete(transaction_t transaction_id, row_t rows[], idx_t count) {
	any_deleted = true;

	idx_t deleted_tuples = 0;
	for (idx_t i = 0; i < count; i++) {

		// already deleted
		if (deleted[rows[i]] == transaction_id) {
			continue;
		}

		// first check the chunk for conflicts
		if (deleted[rows[i]] != NOT_DELETED_ID) {
			// tuple was already deleted by another transaction
			throw TransactionException("Conflict on tuple deletion!");
		}
		// delete
		deleted[rows[i]] = transaction_id;
		rows[deleted_tuples] = rows[i];
		deleted_tuples++;
	}
	return deleted_tuples;
}

// add undo buffer
void DuckTransaction::PushDelete(DataTable &table, ChunkVectorInfo *vinfo, row_t rows[], idx_t count, idx_t base_row) {
	auto delete_info = reinterpret_cast<DeleteInfo *>(
	    undo_buffer.CreateEntry(UndoFlags::DELETE_TUPLE, sizeof(DeleteInfo) + sizeof(row_t) * count));
	delete_info->vinfo = vinfo;
	delete_info->table = &table;
	delete_info->count = count;
	delete_info->base_row = base_row;
	memcpy(delete_info->rows, rows, sizeof(row_t) * count);
}从上面的代码中我们可以看到我们会将当前的transaction id赋值给deleted数组中对应的元素,同时往UndoBuffer中添加对应的Entry, 即将删除的行号写到UndoBuffer中。
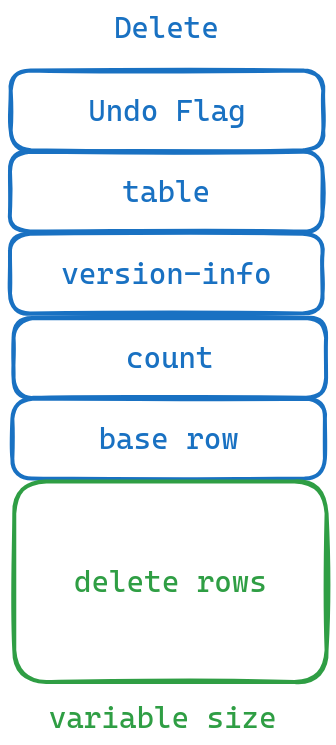
同样的事务的提交为三个流程
-
storage commit
storage commit在Insert中已经讲过了,值得注意的是,当我们扫描Local Storage时,我们会忽略被删除的数据, 因此被删除的数据不会被合并进table中. -
UndoBuffer Commit
-
WAL 刷到磁盘中
与Insert完全一致。
下面我们来分析一下UndoBuffer Commit
case UndoFlags::DELETE_TUPLE: {
		// deletion:
		auto info = reinterpret_cast<DeleteInfo *>(data);

		// write delete info into wal log
		if (HAS_LOG && !info->table->info->IsTemporary()) {
			WriteDelete(*info);
		}

		// mark the tuples as committed
		info->vinfo->CommitDelete(commit_id, info->rows, info->count);
		break;
}
可以看到和Insert几乎一样
- 将删除的行号写进LOG.
- 将table中的对应的version info 由
transaction id更改为commit id
Update
Update 的入口函数为PhysicalUpdate::Sink。
SinkResultType PhysicalUpdate::Sink(ExecutionContext &context, DataChunk &chunk, OperatorSinkInput &input) const {
	//skip....
		table.Update(tableref, context.client, row_ids, columns, update_chunk);
	// skip...

}

void DataTable::Update(TableCatalogEntry &table, ClientContext &context, Vector &row_ids,
                       const vector<PhysicalIndex> &column_ids, DataChunk &updates) {
	// skip...
	auto ids = FlatVector::GetData<row_t>(row_ids);
	auto first_id = FlatVector::GetValue<row_t>(row_ids, 0);
	if (first_id >= MAX_ROW_ID) {
		// update is in transaction-local storage: push update into local storage
		auto &local_storage = LocalStorage::Get(context, db);
		local_storage.Update(*this, row_ids, column_ids, updates);
		return;
	}

	// update is in the row groups
	// we need to figure out for each id to which row group it belongs
	// usually all (or many) ids belong to the same row group
	// we iterate over the ids and check for every id if it belongs to the same row group as their predecessor
	row_groups->Update(transaction, ids, column_ids, updates);
}和delete一样,我们也会通过row-id区分更改的是local storage还是table,我们来看Update的具体逻辑。
// RowGroup Update
void RowGroup::Update(TransactionData transaction, DataChunk &update_chunk, row_t *ids, idx_t offset, idx_t count,
                      const vector<PhysicalIndex> &column_ids) {
	for (idx_t i = 0; i < column_ids.size(); i++) {
		auto column = column_ids[i];
		auto &col_data = GetColumn(column.index);

		if (offset > 0) {
			Vector sliced_vector(update_chunk.data[i], offset, offset + count);
			sliced_vector.Flatten(count);
			col_data.Update(transaction, column.index, sliced_vector, ids + offset, count);
		} else {
			col_data.Update(transaction, column.index, update_chunk.data[i], ids, count);
		}
	}
}
// Column Update
void ColumnData::Update(TransactionData transaction, idx_t column_index, Vector &update_vector, row_t *row_ids,
                        idx_t update_count) {
	lock_guard<mutex> update_guard(update_lock);
	if (!updates) {
		updates = make_uniq<UpdateSegment>(*this);
	}
	Vector base_vector(type);
	ColumnScanState state;
	auto fetch_count = Fetch(state, row_ids[0], base_vector);

	base_vector.Flatten(fetch_count);
	updates->Update(transaction, column_index, update_vector, row_ids, update_count, base_vector);
}
从上面的代码我们可以得知,我们仍旧是先找需要Update的RowGroup, 再找需要Update的ColumnData,每一个ColumnData都有一个UpdateSegment,这里面存放着数据的历史版本。而其修改的流程与我们前面介绍的MVCC一致。
/ @brief Update the segment with the given transaction data
// @param transaction The transaction data
// @param column_index The index of the column to update
// @param update The vector containing the update data
// @param ids The row ids to update
// @param count The amount of ids to update
// @param base_data The original data of the column
void UpdateSegment::Update(TransactionData transaction, idx_t column_index, Vector &update, row_t *ids, idx_t count,
                           Vector &base_data) {
	// obtain an exclusive lock
	auto write_lock = lock.GetExclusiveLock();

	update.Flatten(count);
	// skip....
	if (root->info[vector_index]) {
		// there is already a version here, check if there are any conflicts and search for the node that belongs to
		// this transaction in the version chain
		auto base_info = root->info[vector_index]->info.get();

		auto node = base_info->next;
		while (node) {
			if (node->version_number == transaction.transaction_id) {
				// it has! use this node
				break;
			}
			node = node->next;
		}
			node->segment = this;
			node->vector_index = vector_index;
			node->N = 0;
			node->column_index = column_index;

			// insert the new node into the chain
			node->next = base_info->next;
			if (node->next) {
				node->next->prev = node;
			}
			node->prev = base_info;
			base_info->next = transaction.transaction ? node : nullptr;
		}
		// now we are going to perform the merge
		// because we found this txn has done update before
		// so we just merge the update into the node
		merge_update_function(base_info, base_data, node, update, ids, count, sel);
	} else {
		// there is no version info yet: create the top level update info and fill it with the updates
		auto result = make_uniq<UpdateNodeData>();

		result->info = make_uniq<UpdateInfo>();
		result->tuples = make_unsafe_uniq_array<sel_t>(STANDARD_VECTOR_SIZE);
		result->tuple_data = make_unsafe_uniq_array<data_t>(STANDARD_VECTOR_SIZE * type_size);
		result->info->tuples = result->tuples.get();
		result->info->tuple_data = result->tuple_data.get();
		result->info->version_number = TRANSACTION_ID_START - 1;
		result->info->column_index = column_index;
		InitializeUpdateInfo(*result->info, ids, sel, count, vector_index, vector_offset);
		// skip...
		InitializeUpdateInfo(*transaction_node, ids, sel, count, vector_index, vector_offset);

		// we write the updates in the update node data, and write the updates in the info
		initialize_update_function(transaction_node, base_data, result->info.get(), update, sel);

		result->info->next = transaction.transaction ? transaction_node : nullptr;
		result->info->prev = nullptr;
		transaction_node->next = nullptr;
		transaction_node->prev = result->info.get();
		transaction_node->column_index = column_index;

		transaction_node->Verify();
		result->info->Verify();

		root->info[vector_index] = std::move(result);
	}
}代码很长,但是实际干的事情就是一件事,将修改前的数据保存下来做成一个UndoBuffer的Entry写入UndoBuffer,然后直接本地修改,即base_info更新数据,然后将Entry插入到base_info的next。
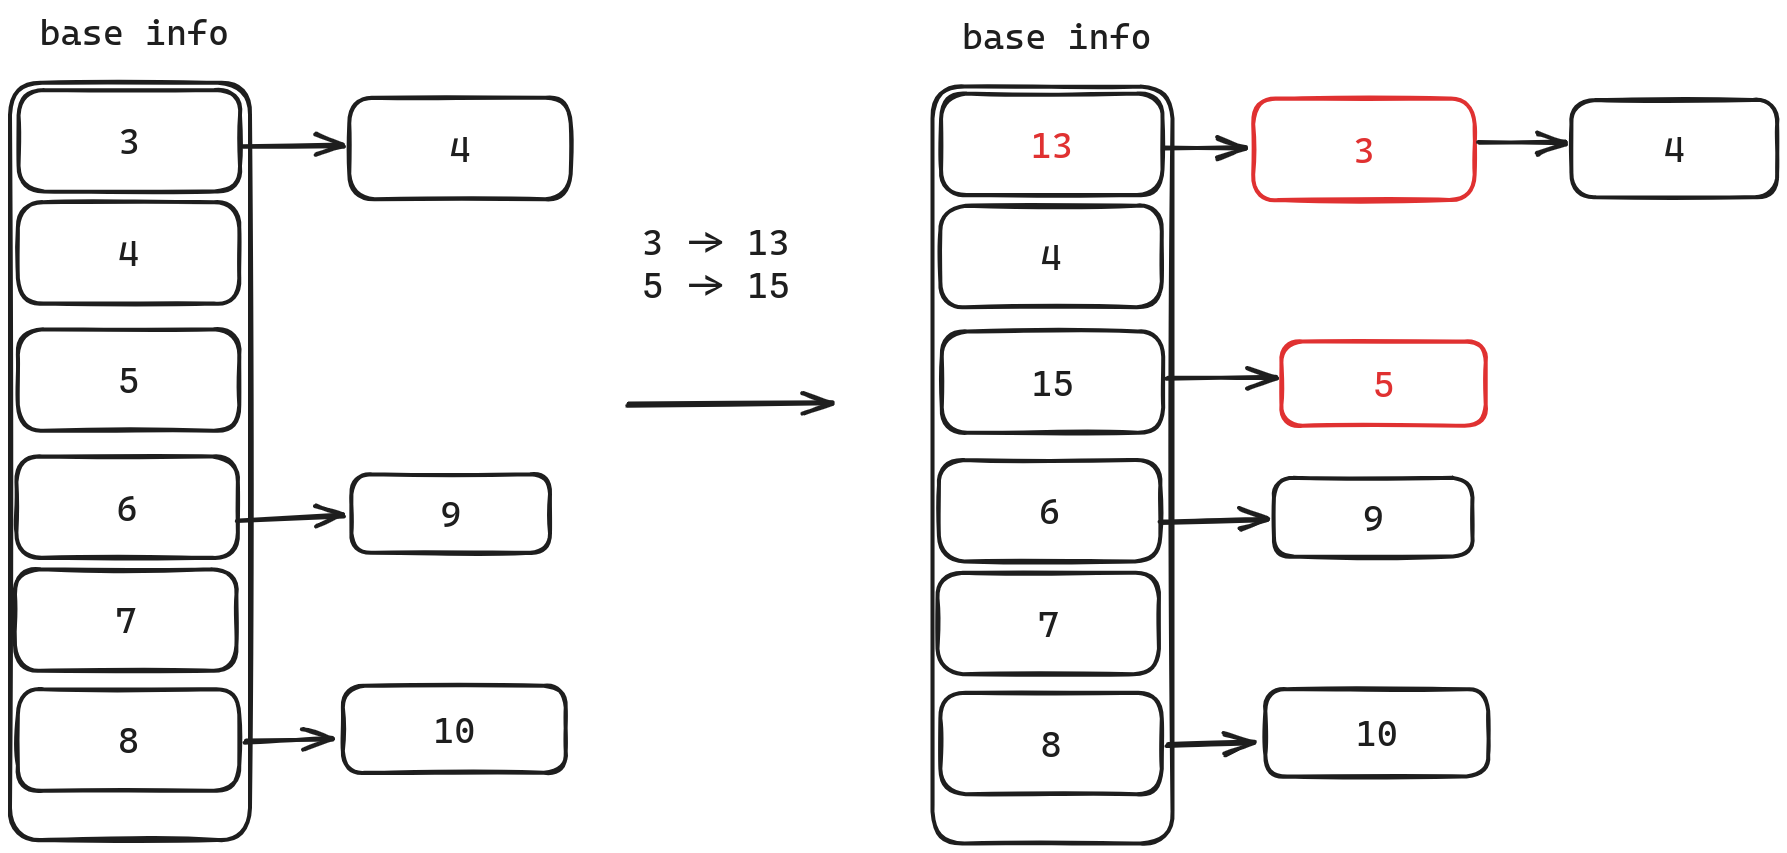
最后相同的流程 同样的事务的提交为三个流程
- storage commit
- UndoBuffer Commit
- WAL 刷到磁盘中
不同的只有UndoBuffer Commit
case UndoFlags::UPDATE_TUPLE: {
		// update:
		auto info = reinterpret_cast<UpdateInfo *>(data);
		if (HAS_LOG && !info->segment->column_data.GetTableInfo().IsTemporary()) {
			WriteUpdate(*info);
		}
		info->version_number = commit_id;
		break;
}同样将哪些column变了,写入到WAL中。然后将Update Info的version number从transaction id变为commit id,表明提交成功。
Scan
最后我们来讲一下Scan,有了前面的铺垫,Scan就相对容易一些了。
Scan的入口函数为PhysicalTableScan::GetData
SourceResultType PhysicalTableScan::GetData(ExecutionContext &context, DataChunk &chunk,
                                            OperatorSourceInput &input) const {
	D_ASSERT(!column_ids.empty());
	auto &gstate = input.global_state.Cast<TableScanGlobalSourceState>();
	auto &state = input.local_state.Cast<TableScanLocalSourceState>();

	TableFunctionInput data(bind_data.get(), state.local_state.get(), gstate.global_state.get());
	function.function(context.client, data, chunk);

	return chunk.size() == 0 ? SourceResultType::FINISHED : SourceResultType::HAVE_MORE_OUTPUT;
}

static void TableScanFunc(ClientContext &context, TableFunctionInput &data_p, DataChunk &output) {
	// skip...
	do {
		if(/*skip....*/) {
		} else {
			// scan!!
			storage.Scan(transaction, output, state.scan_state);
		}
		// skip...
	} while (true);
}

void DataTable::Scan(DuckTransaction &transaction, DataChunk &result, TableScanState &state) {
	// scan the persistent segments
	// table state is the the presistent data
	if (state.table_state.Scan(transaction, result)) {
		D_ASSERT(result.size() > 0);
		return;
	}

	// scan the transaction-local segments

	// this was added to the local storage
	auto &local_storage = LocalStorage::Get(transaction);
	local_storage.Scan(state.local_state, state.GetColumnIds(), result);
}从代码中我们可以看到Scan的流程为先扫描Table再扫描Local Storage。 对于Table的扫描,同样也是一个rowGroup,一个rowGroup来扫描的。我们主要看一下对RowGroup的扫描。
template <TableScanType TYPE>
void RowGroup::TemplatedScan(TransactionData transaction, CollectionScanState &state, DataChunk &result) {

	auto table_filters = state.GetFilters();
	const auto &column_ids = state.GetColumnIds();
	auto adaptive_filter = state.GetAdaptiveFilter();
	while (true) {

		idx_t current_row = state.vector_index * STANDARD_VECTOR_SIZE;
		// each time scan entire vector, unless remaining less than STANDARD_VECTOR_SIZE
		auto max_count = MinValue<idx_t>(STANDARD_VECTOR_SIZE, state.max_row_group_row - current_row);

		// second, scan the version chunk manager to figure out which tuples to load for this transaction
		idx_t count;
		SelectionVector valid_sel(STANDARD_VECTOR_SIZE);
		if (TYPE == TableScanType::TABLE_SCAN_REGULAR) {
			// get what is needed to scan in this vector
			// may be it's deleted by this transaction or inserted by other transaction
			count = state.row_group->GetSelVector(transaction, state.vector_index, valid_sel, max_count);
			if (count == 0) {
				// nothing to scan for this vector, skip the entire vector
				// increase state.vector_idx, and make every column skip ${count} vector data
				NextVector(state);
				continue;
			}
		}
			if (count == 0) {
				// nothing to scan for this vector, skip the entire vector
				NextVector(state);
				continue;
			}
		} else {
			count = max_count;
		}
		// skip...
	}
}
因为代码很长,我们分段来看,首先上面的代码中最重要的就是
state.row_group->GetSelVector(transaction, state.vector_index, valid_sel, max_count);这句的含义是,确定这个rowGroup有哪些是我们这个transaction可见的,因为有些数据可能是被其他transaction添加的,对于我们来说应该是不可见的。我们可以通过insert-id和delete-id来进行判断
	static bool UseInsertedVersion(transaction_t start_time, transaction_t transaction_id, transaction_t id) {
		return id < start_time || id == transaction_id;
	}

	static bool UseDeletedVersion(transaction_t start_time, transaction_t transaction_id, transaction_t id) {
		return !UseInsertedVersion(start_time, transaction_id, id);
	}
对于Insert,如果它的Commit时间小于start time 或者 它就是这个事务添加的。那么应该是可见的。 对于Delete,如果它的Commit时间大于start time 或者 它不是这个事务删除的。那么它不应该被删除,即应该是可见的。
在确定了哪些tuple是可见后,我们就应该尝试去读取数据了。
if (count == max_count && !table_filters) {
	// scan all vectors completely: full scan without deletions or table filters
	for (idx_t i = 0; i < column_ids.size(); i++) {
		const auto &column = column_ids[i];
		if (column == COLUMN_IDENTIFIER_ROW_ID) {
			// scan row id
			D_ASSERT(result.data[i].GetType().InternalType() == ROW_TYPE);
			result.data[i].Sequence(this->start + current_row, 1, count);
		} else {
			auto &col_data = GetColumn(column);
			if (TYPE != TableScanType::TABLE_SCAN_REGULAR) {
				col_data.ScanCommitted(state.vector_index, state.column_scans[i], result.data[i], ALLOW_UPDATES);
			} else {
				col_data.Scan(transaction, state.vector_index, state.column_scans[i], result.data[i]);
			}
		}
	}
}
如果全部可见,且没有filter,那么我们直接对每一个column进行读取。
template <bool SCAN_COMMITTED, bool ALLOW_UPDATES>
idx_t ColumnData::ScanVector(TransactionData transaction, idx_t vector_index, ColumnScanState &state, Vector &result) {
	// we have got data in the table into the result
	// the total count in this result is scan count
	auto scan_count = ScanVector(state, result, STANDARD_VECTOR_SIZE);

	lock_guard<mutex> update_guard(update_lock);
	if (updates) {
		if (!ALLOW_UPDATES && updates->HasUncommittedUpdates(vector_index)) {
			throw TransactionException("Cannot create index with outstanding updates");
		}
		result.Flatten(scan_count);
		if (SCAN_COMMITTED) {
			updates->FetchCommitted(vector_index, result);
		} else {
			updates->FetchUpdates(transaction, vector_index, result);
		}
	}
	return scan_count;
}

// MVCC read
template <class T>
	static void UpdatesForTransaction(UpdateInfo *current, transaction_t start_time, transaction_t transaction_id,
	                                  T &&callback) {
		while (current) {
			if (current->version_number > start_time && current->version_number != transaction_id) {
				// these tuples were either committed AFTER this transaction started or are not committed yet, use
				// tuples stored in this version
				// update the coressponding data
				callback(current);
			}
			current = current->next;
		}
}
上面的代码先读取这个column的原始数据,然后看它有没有Update,如果有的话,就根据我们之前描述的MVCC的方式进行更新。
如果有Filter的话,会根据Filter条件先进行过滤,再根据过滤后的数据去获得相应的ColumnData,方式与上面描述的一样。
if (table_filters) {
	D_ASSERT(adaptive_filter);
	D_ASSERT(ALLOW_UPDATES);
	for (idx_t i = 0; i < table_filters->filters.size(); i++) {
		auto tf_idx = adaptive_filter->permutation[i];
		auto col_idx = column_ids[tf_idx];
		auto &col_data = GetColumn(col_idx);
		col_data.Select(transaction, state.vector_index, state.column_scans[tf_idx], result.data[tf_idx],sel, approved_tuple_count, *table_filters->filters[tf_idx]);
	}
	for (auto &table_filter : table_filters->filters) {
		result.data[table_filter.first].Slice(sel, approved_tuple_count);
	}
}

//! Now we use the selection vector to fetch data for the other columns.
for (idx_t i = 0; i < column_ids.size(); i++) {
	// we fetch column data for all columns that were not used for filtered
	// skip...
	col_data.FilterScanCommitted(state.vector_index, state.column_scans[i], result.data[i], sel,approved_tuple_count, ALLOW_UPDATES);
}
最后将读取的数据全部返回。
总结
MVCC与增删改查的东西确实太多了,很难面面俱到,因此这篇文章也只能说把大体的轮廓介绍了一下。如果想知道全部的细节,还是需要去阅读源码。如果有任何不理解,或者觉得描述的不太清晰的,请随时留言提出。